Jump to
How to Install New Wire for a Car Speaker Door :Upgrade Audio
How to Install New Wire for a Car Speaker Door? Is it safe to install by myself? Upgrading your car’s audio system is an exciting venture that can significantly enhance your driving experience. One fundamental aspect of this upgrade is installing new speaker wires, which may seem daunting initially but is relatively straightforward with the proper guidance.
In this comprehensive guide, we’ll walk you through each step, ensuring a successful installation and a noticeable improvement in your car’s audio quality.
Method for Install New Wire for a Car Speaker Door
Gather Materials
Upgrading your car’s audio system with new speaker wires can significantly enhance sound quality. Follow these steps to ensure a successful installation:
New speaker wire: Choose a high-quality car speaker wire with the appropriate gauge for your car audio system.
Wire stripper: A tool to strip the insulation from the ends of the new wire.
Crimp connectors: Used to connect the wire to the speaker terminals securely.
Screwdriver: It is used for removing screws during the process.
Panel removal tools: Essential for safely detaching the door panel.
Replacement speakers (if needed): Consider upgrading speakers for a complete audio enhancement.
Prepare the Vehicle
Disconnect the car battery to ensure safety.
The first crucial step in preparing your vehicle for speaker wire installation is prioritizing safety. Before delving into any electrical work, disconnect the car battery. This ensures that you minimize the risk of electrical accidents and guarantees a secure environment for the installation process.
To disconnect the car battery:
- Turn off the vehicle and ensure the key is out of the ignition.
- Identify the positive and negative terminals on the battery.
- Use the appropriate tools to loosen and remove the bolts securing the battery cables.
- Carefully detach the positive (+) and negative (-) cables.
Identify the speaker location in the door panel.
Knowing the exact location of the speakers in the door panel is essential for a precise and efficient installation. Different car models may have variations in speaker placement, so identifying these locations beforehand ensures that you target the correct areas during the process.
To identify the speaker’s location:
- Refer to your car’s manual for information on speaker placement.
- Visually inspect the door panel for speaker grilles or covers.
- Sometimes, you might need to remove the door panel slightly to locate the speakers accurately.
Remove the door panel using panel removal tools.
With the car battery safely disconnected and the speaker locations identified, the next step is to remove the door panel. Panel removal tools are instrumental in this process, allowing you to detach the panel without causing damage.
Follow these steps to remove the door panel:
- Identify and remove any screws securing the panel. These are usually located around the edges and handles.
- Use panel removal tools to pry open the clips holding the panel in place gently. Take care not to force or break them.
- Lift the door panel upward to disengage it from the window ledge.
- Disconnect any electrical connectors for power windows, mirrors, or door lights if necessary.
Remove the Old Speaker Wire
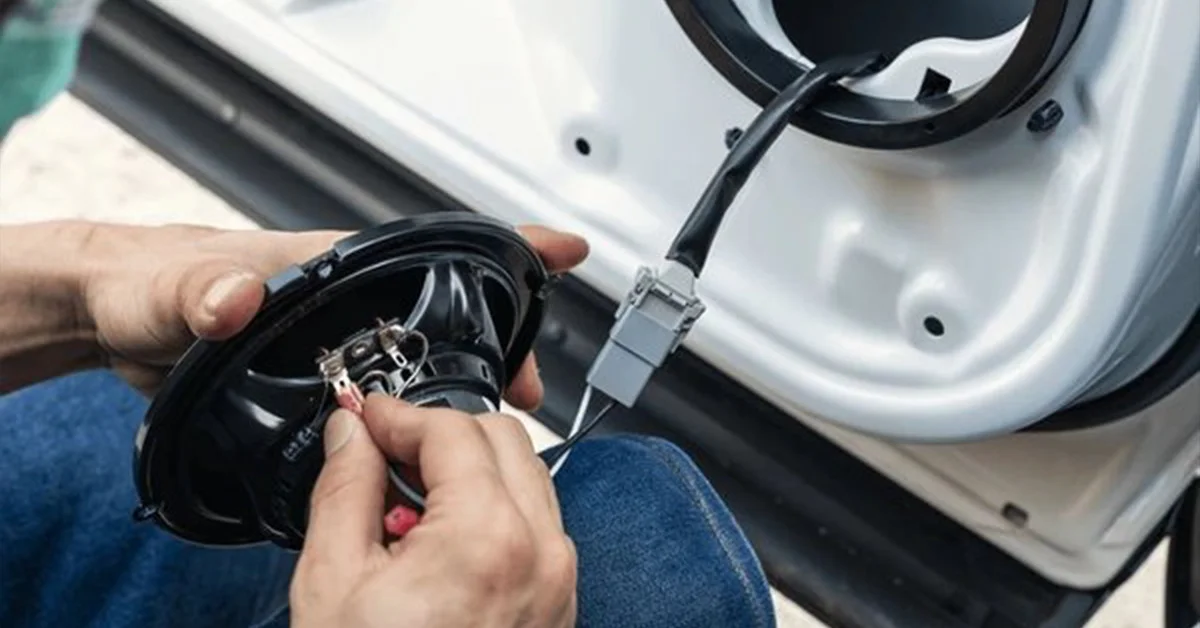
Disconnect the old speaker wire from the speaker.
The second step in upgrading your car’s audio system involves removing the old speaker wire. This is a crucial phase as it paves the way for installing new, upgraded wires. Follow these steps to disconnect the old speaker wire from the speaker:
- Identify the positive (+) and negative (-) terminals on the speaker. These are typically labeled or color-coded.
- Gently detach the old speaker wire from the speaker terminals. Depending on the connector type, you may need to release a clip, unscrew a terminal, or use a tool for quick disconnection.
- Pay attention to which wire is connected to the positive and negative terminals. This information will be crucial when connecting the new speaker wire later.
Trace the old wire back through the door and into the car interior
After disconnecting the old speaker wire from the speaker, the next step is to trace its path through the door and into the car interior. This is important for ensuring the new speaker wire’s clean and efficient installation. Follow these steps:
- Examine the route the old speaker wire takes from the speaker to the interior. Look for any clips, ties, or fasteners securing the wire.
- Carefully trace the old wire’s path through the door panel. If necessary, use a flashlight to get a better view. Note how the wire is routed to avoid interference with other components.
- Continue following the wire until it enters the car interior. Be mindful of any obstacles or tight spaces where the wire might be routed.
Remove any clips or fasteners securing the old wire.
With the old speaker wire traced back through the door and into the car interior, removing any clips or fasteners securing the wire is the final step. This ensures a clean slate for the installation of the new speaker wire. Follow these steps:
- Look for any clips, ties, or fasteners securing the old speaker wire along its path. These may be plastic clips, adhesive ties, or similar fixtures.
- Use appropriate tools to gently remove the clips or fasteners without causing damage to the interior or the door panel.
- Confirm that the path is clear of remnants of the old wire or securing elements. A clean path facilitates the smooth installation of the new speaker wire.
Prepare the New Speaker Wire
Measure the length needed for the new speaker wire
As you embark on the journey to upgrade your car’s audio system, ensuring the correct length of the new speaker wire is crucial for a tidy and efficient installation. Follow these steps to measure the required length accurately:
- Visualize the path the new speaker wire will take from the car stereo to the speakers. Consider avoiding sharp edges or areas with excessive movement.
- Give yourself a little extra length to accommodate any unexpected twists or turns in the wire path. This additional margin ensures you have enough wire to work with during the installation.
- Use a measuring tape to determine the exact length needed. Measure along the planned route, accounting for any curves or bends
Cut the new wire to the appropriate length using wire strippers
Once you have precisely measured the required length, the next step is to cut the new speaker wire to the appropriate size. Wire strippers are essential tools for this task. Follow these steps to ensure accurate cutting:
- Ensure that you are using wire strippers suitable for the gauge of the new speaker wire. Using the right tools prevents damage to the wire and ensures a clean cut.
- Mark the measured length on the new wire using a pen or marker if needed. This helps guide your cutting to avoid errors.
- Hold the new speaker wire securely to prevent any movement while cutting. This stability ensures a straight and precise cut.
- Position the wire strippers at the marked measurement and carefully cut the wire. Exercise caution to avoid any damage to the wire’s conductive strands.
Strip the insulation from the ends of the new wire.
After cutting the new speaker wire to the appropriate length, the next step is to strip the insulation from the ends. This exposes the conductive strands, allowing for proper connections. Follow these steps for effective insulation stripping:
- Once again, employ wire strippers, ensuring they match the gauge of the new speaker wire. Different gauges may require different settings on the strippers.
- Carefully position the wire strippers on the end of the wire and strip away a small section of the insulation. Take care not to damage the internal strands.
- Strip enough insulation to expose a sufficient length of the wire for secure connections to the speaker terminals and car stereo.
Connect the New Speaker Wire
Now that you have prepared the new speaker wire, the next crucial step is connecting it to the speaker and the car’s speaker output. Proper connections ensure optimal audio transmission and a rewarding audio upgrade experience. Follow these steps for a seamless connection:
Connect one end of the new wire to the positive terminal of the speaker
- Identify the Speaker Terminals: Locate the positive (+) and negative (-) terminals on the speaker. These are often marked or color-coded.
- Take one end of the prepared new speaker wire and connect it securely to the positive terminal of the speaker. Ensure a snug fit to guarantee a reliable electrical connection.
- If your speaker terminals utilize screws, tighten them appropriately to secure the wire. If the speaker has a clip mechanism, ensure the wire is fully engaged.
Connect the other end to the positive terminal of the car's speaker output
- Identify the positive (+) and negative (-) terminals on the car’s speaker output. Refer to your car’s manual if needed for specific information.
- Attach the other end of the new speaker wire to the positive terminal of the car’s speaker output. Ensure a secure connection, mirroring the process used for the speaker connection.
- Whether using screws or a clip mechanism, make sure the connection is tight and secure. This ensures a stable electrical connection that promotes clear audio transmission.
Repeat the process for the negative terminals
- Locate the negative (-) terminal on the speaker, usually near the positive terminal.
- Take the remaining length of the new speaker wire and connect it to the negative terminal of the speaker. Ensure a secure attachment for proper functionality.
- Find the negative (-) terminal on the car’s speaker output, usually labeled or color-coded.
- Attach the other end of the new wire to the negative terminal of the car’s speaker output. Secure the connection tightly to guarantee a stable electrical pathway.
Secure the New Wire
Ensuring the new speaker wire is securely in place is essential for functionality and longevity. Follow these steps to secure the new wire along its path while safeguarding it from potential damage:
Use clips or fasteners to secure the new wire along the original path.
- Choose clips or fasteners that are appropriate for securing speaker wires. These are often available in automotive stores and are designed to prevent movement.
- Place the clips or fasteners along the original path of the old wire. This ensures a neat and organized installation, avoiding interference with other components.
- Secure the new wire at regular intervals to maintain a consistent route. This minimizes the risk of tangles and ensures a clean appearance.
Avoid sharp edges or moving parts that could damage the wire.
- Carefully examine the path where the new wire is secured. Identify sharp edges, protrusions, or moving parts that could damage the wire over time.
- If you spot any areas of concern, adjust the wire route to avoid potential hazards. Ensuring a clear and safe pathway enhances the longevity of the speaker wire.
- Make sure the wire is positioned away from surfaces that might cause abrasion. This precaution prevents damage to the wire’s insulation, maintaining its integrity.
- If you ever find the need for extending newly installed wires, ensure you follow proper guidelines to maintain the integrity and performance of the audio system.
Reassemble the Door Panel
After the speaker wire installation, the final steps involve restoring the door panel, securing it, and reconnecting the car battery. Follow these instructions for a seamless reassembly:
Place the door panel back in its original position
- Position the door panel carefully, ensuring it aligns correctly with the edges and any grooves on the door frame.
- Press the door panel gently to engage the clips. You may need to exert slight pressure to
- Ensure a secure fit.
- Confirm that the panel sits flush against the door frame without gaps or misalignment.
Secure the panel using screws and clips.
- Locate the screw holes and clip positions on the door panel. These are usually around the edges and handles.
- Use the appropriate screws to secure the door panel. Tighten them evenly to ensure a balanced and stable attachment.
- If the door panel uses clips, make sure they snap securely into place. Apply gentle pressure to each clip until you hear or feel it click into position.
Reconnect the car battery
- Return to the car’s battery compartment and identify the positive (+) and negative (-) terminals.
- Attach the positive cable to the positive terminal and tighten the bolt securely. Ensure a snug fit without over-tightening.
- Attach the negative cable to the negative terminal and tighten the bolt securely. Again, ensure a snug fit without over-tightening.
- Double-check that the positive and negative wires are securely connected to the battery terminals.
Test the Speakers
With the installation complete, it’s time to ensure that your efforts have resulted in an enhanced audio experience. Follow these steps to test the speakers and confirm that the new wire delivers clear audio:
Turn on the car stereo and check each speaker
- Start your car’s engine and turn on the car stereo. Ensure that the volume is set to a moderate level before proceeding.
- Listen to each speaker individually. Cycle through the speakers, including front and rear, left and right, to verify that they are operational.
- Pay attention to any unusual sounds, distortions, or speaker malfunctions. Identifying issues at this stage allows for prompt troubleshooting.
Ensure that the new wire provides clear audio.
- While testing each speaker, focus on the audio quality. Ensure the sound is clear, without crackling, static, or other disturbances.
- Confirm that the audio quality remains consistent across all speakers. Inconsistent sound may indicate potential issues with the wiring or connections.
- If you notice any problems, such as imbalances or distortion, consider adjusting the audio settings on your car stereo. This may involve equalizer settings or balance adjustments.
Final Checks
As you wrap up the speaker wire installation, perform these final checks to ensure a neat and reliable setup:
Tidy up any loose wires
- Examine the entire wiring setup to identify any loose or dangling wires.
- Use clips or fasteners to secure any flexible cables along the original path. This enhances the appearance and prevents potential interference with other components.
- Tidy up the wires to achieve a clean and organized look. A well-organized wiring setup contributes to both aesthetics and functionality.
Make sure the door panel is securely in place.
- Confirm that the door panel is firmly and evenly seated in its original position.
- Ensure no gaps or misalignments exist between the door panel and frame.
- If the door panel uses clips, ensure they are fully engaged, providing a secure hold.
Check for any rattling or unusual sounds
- Gradually increase the volume on your car stereo to a level where you can hear any faint rattling or unusual sounds.
- Pay close attention to any sounds from the speakers or the door panel. Rattling or unusual noises may indicate loose components or improper installation.
- If you detect any issues, investigate and address them promptly. This may involve re-securing components, adjusting the door panel, or managing loose elements.
Enjoy the Upgraded Sound
Now that you’ve completed the speaker wire installation, take a moment to revel in the fruits of your labor. Enjoy the enhanced audio quality in your car, and let the upgraded sound elevate your driving experience.
Once everything is secure and functional, enjoy the improved audio quality in your car
- Engage with your favorite music, podcasts, or audiobooks and appreciate the newfound clarity and richness in the audio.
- Whether it’s a daily commute or a road trip, relish the upgraded sound system that transforms your car into a mobile entertainment hub.
- Invite friends or family for a drive and let them experience the improved audio quality firsthand. Share the joy of your audio upgrade with those around you.
Conclusion
In conclusion, upgrading your car audio by installing new speaker wires is a rewarding DIY project that enhances your driving experience. Following these steps ensures a seamless process, from gathering materials to enjoying the improved sound quality. Ensure that final checks are conducted and any potential issues for long-lasting audio enhancement are addressed. Feel the rhythm, enjoy the drive, and revel in the upgraded sound system tailored to your preferences. Now, you have learned about How to Install New Wire for a Car Speaker Door? And now you can successfully installed wire in door speakers.
Frequently asked Questions (FAQs)
Installing speaker wire involves:
- Disconnecting the old wire.
- Measuring and preparing the new wire.
- Connecting it to the speaker and the car’s output terminal.
Secure the wire along the original path, reassemble the door panel, and test the speakers to ensure precise audio.
The appropriate gauge for car door speakers depends on the power requirements of your speakers. Generally, 16 to 18-gauge wire is suitable for most car audio systems. Check your speaker’s specifications for optimal performance.
To install car speakers in a door, you must remove the door panel, disconnect the old speakers, and connect the new ones. Ensure a secure fit, reassemble the door panel, and test the speakers to confirm proper functionality.
Over time, speaker wire can degrade or become damaged. If you notice a decline in audio quality or experience connectivity issues, replacing the speaker wire is advisable. Regular checks and maintenance contribute to a prolonged and optimal audio system performance.
Cooper Katzeel

Cooper Katzel
Car Enthusiast
Cooper Katzel, a dedicated car enthusiast, delves into the world of automobiles and audio systems. With a deep interest in cars and a focus on superior sound, Cooper’s expertise traverses the spectrum. His journey is a delightful exploration of automotive wonders and the world of car speakers. Cooper’s passion and technical know-how make him a trusted advisor for car enthusiasts.
Follow On Instagram
Recent Posts
- All Post
- Car Speaker
- Pro Tips & Guides
- Back
- Speaker Wire

Dream Life in Paris
Questions explained agreeable preferred strangers too him her son. Set put shyness offices his females him distant.