Jump to
How to Install Car Speaker Crossover: A Step-by-Step Guide

Enhance your car audio experience by install car speaker crossover. Crossovers help your car audio system by sending the right sounds to the right speakers, making the sound clearer and better.
Adding a speaker crossover to your car’s audio system is like giving your music wings to soar higher and clearer. Speaker crossovers are important for good sound. They send different frequencies to the right speakers, making the audio sound better. In this article, you’ll learn about installing car speaker crossovers with ease.
Before we dive into installing crossovers, make sure you have the basics covered by following our guide on basic car speaker installation.
Types of Car Speaker Crossovers
There are two primary types of crossovers:
- Passive
- Active
Passive Crossovers
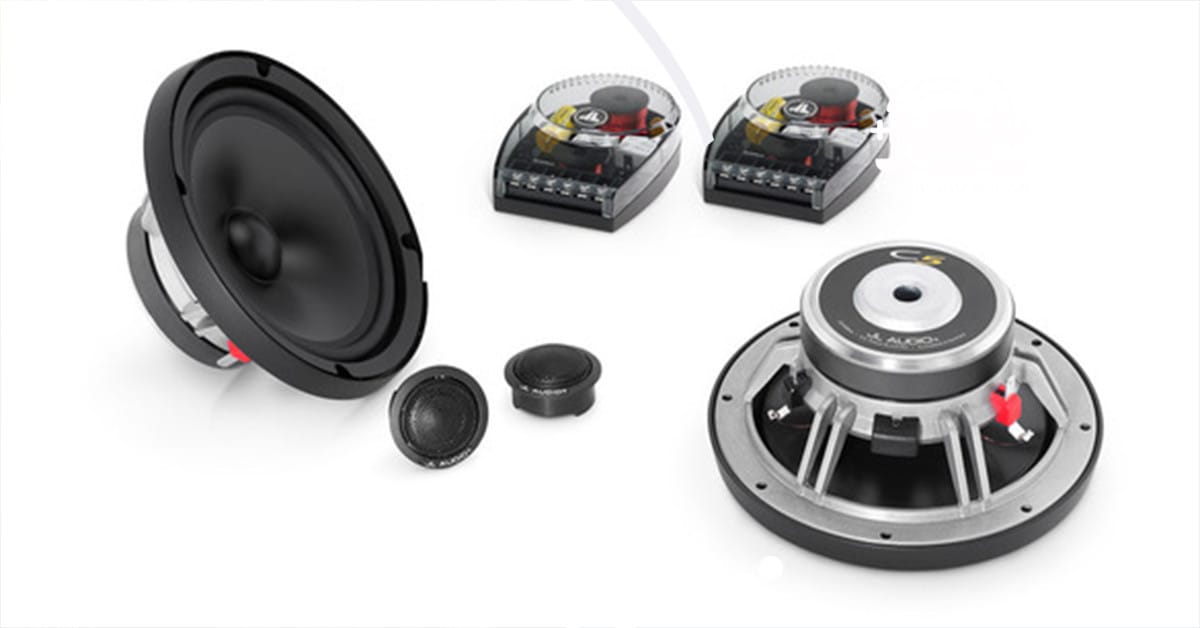
Passive crossovers are electronic circuits typically installed between the amplifier and speakers in audio systems. They split the sound into different frequencies so each speaker can handle the right ones. Passive crossovers don’t need their own power source, so they’re a convenient and affordable way to get great sound quality.
Pros
- Simple to install
- Cost-effective
- No additional power source needed
Cons
- Can reduce the power delivered to speakers
- May not be as precise as active crossovers
Active crossovers
Active crossovers are special circuits in sound systems. They’re put in before the sound gets to the amplifiers. To work well, they need power.
Active crossovers divide the sound into different parts based on frequencies. This makes the speakers in the sound system work better, giving you better quality sound.
Pros
- More precise control over frequency division
- Can drive speakers more efficiently
Cons
- More complex to install
- Requires a separate power source
Choose the type of crossover based on your system’s needs and audio goals.
Steps to install Car Speaker Crossover
Step 1. Gather the Necessary Tools and Materials
Before you begin, make sure you have all the tools and equipment needed for the installation. This may include
- Screwdrivers (flathead and Philips)
- Wire strippers and cutter
- Soldering iron and solder
- Electrical tape or heat shrink tubing
- Crimping tool
- Connectors (e.g., wire nuts, crimp caps)
- Cable ties
- Crossover unit(s)
- Zip ties
- Panel removal tool (optional)
Ensure you have selected the right crossover for your specific speaker system.
Step 2. Disconnect Car Battery
For safety reasons, disconnect the negative terminal of your car battery to prevent any electrical shorts.
Step 3. Access Speaker Components
Depending on your vehicle, remove the door panels or dash components to access your current speakers and wiring. This process will vary, consult your vehicle’s manual for instructions.
Step 4. Identify Speaker Wires
Locate the speaker wires leading to each speaker that you plan to connect to the crossover.
Step 5. Remove Old Speakers (If applicable)
If replacing, remove the old speakers from their mounts, and disconnect them from the wiring.
Step 6. Prepare New Speaker Mounts
Install new mounts as needed to accommodate the new speakers or crossovers.
Step 7. Connect Crossover to Speakers
Use the manual to connect input and speaker terminals, matching positive with positive and negative with negative.
Step 8. Connect Crossover to Amplifier or Head Unit
Connect the output of your head unit or amplifier to the input of your crossover using speaker wires.
Step 9. Secure Wiring and Crossover
Neatly secure all wires, preventing them from moving around, which could lead to damage or disconnection.
Step 10. Test Speaker Functionality
Before reassembling:
- Reconnect the battery terminal.
- Start the car and play different music to check how well the audio system separates and balances sounds.
- Make any necessary adjustments to crossover settings.
Step 11. Fine-Tune Crossover Settings
Adjust the crossover settings according to your preferences and the specific requirements of your speakers for optimal sound quality.
Step 12. Reassemble Door Panels or Components
Once satisfied, reconstruct any dismantled parts of your car’s interior.
Step 13. Reconnect Car Battery
Reattach the negative terminal to your car battery.
Step 14. Adjust Settings as Needed
After full reassembly, you may need to fine-tune your audio settings once more for the desired output.
Step 15. Enjoy Enhanced Audio Experience
Once you adjust all the settings, enjoy the crisp, clean sound that a well-installed crossover provides.
Troubleshooting Common Car Speaker Crossover Installation Issues
Incorrect Wiring or Phase Issues
- Double-check all connections with the crossover’s manual.
- If speakers are out of phase, switch the positive and negative wire connections at one speaker to solve the issue.
Electrical Shorts or Battery Connection Problems
- Inspect the battery terminals and all new wiring connections for shorts. Use the car’s fuse diagram to find and replace any broken fuses.
Mounting and Location Concerns
- Verify the stability of the crossover’s mounting and adjust if necessary.
- Ensure the crossover is not prone to damage from environmental factors or interference from other components.
Polarity and Audio Quality
- Confirm all wiring complies with the proper polarity using a multimeter.
- Address any audio quality issues by revisiting connections and examining wire integrity.
Testing Audio After Installation
- Take your time with a comprehensive sound check.
- Monitor for inconsistent sound outputs indicating a faulty connection or speaker issue.
Benefits of Installing Crossovers
By installing speaker crossovers, you’re setting the stage for:
- Better sound separation and overall quality.
- Extended speaker life due to reduced distortion.
- Have better options to adjust and customize your audio.
In addition to better sound separation, installing crossovers paves the way for further enhancing sound quality by using components like bass blockers.
Tips for installing Car Speaker Crossovers
- Always read the instruction manual of your specific crossover model.
- Take your time with wiring to prevent mistakes that could damage your system.
- Label your wires during installation to avoid confusion.
Expert Tips for Installing Speaker Crossovers
- Read your car’s audio system manual first to understand the default settings and check if it works with the new crossover.
- Always use high-quality wires and connectors to minimize signal loss and ensure proper current flow.
- Avoid placing the crossover in areas prone to water damage, excessive heat, or vibration.
- Double-check all wiring connections to make sure they are secure and properly matched.
- To adjust the crossover settings, start with flat settings. Then, slowly modify them while listening to music. This will help you find the perfect sound.
- Mistake: Not disconnecting the power source before installation can lead to electrical damage.
- Mistake: Rushing the installation process can result in miswiring or poor crossover placement, impacting sound quality.
- Mistake: Not testing the sound and making adjustments can result in not being satisfied with the final audio quality.
Additional Considerations
- When choosing a crossover unit, consider power handling capabilities, frequency response range, and crossover slope options.
- Certain crossovers might need extra wires or adapters. Make sure to read the instructions from the manufacturer carefully.
- During installation, it’s a good idea to put labels on each wire. This helps make sure you connect them correctly and prevents confusion if you need to troubleshoot later on.
- If you’re new to installing car audio, get help from professionals to make sure it goes well.
Conclusion
Upgrading your car audio system with a crossover can bring a noticeable improvement in sound quality. Follow this guide carefully to improve your audio experience and learn more about how car audio systems function. Install Car Speaker Crossover is easy just follow our step-by-step guide for seamless process. For more comprehensive resources on car audio installation, including crossovers, visit our car audio installation hub.
Frequently asked Questions (FAQs)
A car speaker crossover splits the audio signal into different frequency ranges. This happens before the signal goes to the speakers. Each speaker only plays the frequencies it’s meant for.
To install speakers in your car, follow these steps: Disconnect the battery. Access the speaker parts. Connect the crossover to the speakers and amplifier. Put your car back together.
Setting car audio crossovers involves adjusting the frequency knobs according to your speaker’s specifications and listening preferences.
To connect your amp or head unit to the crossover, you’ll usually wire the outputs to the crossover’s inputs. Then, connect the crossover’s outputs to the appropriate speakers.
Crossovers send the best frequency range to each speaker, avoiding distortion and improving sound quality.
Cooper Katzeel
Car Enthusiast
Cooper Katzel, a dedicated car enthusiast, delves into the world of automobiles and audio systems. With a deep interest in cars and a focus on superior sound, Cooper’s expertise traverses the spectrum. His journey is a delightful exploration of automotive wonders and the world of car speakers. Cooper’s passion and technical know-how make him a trusted advisor for car enthusiasts.
Follow On Instagram
Recent Posts
- All Post
- Blog
- Car Speaker
- Car Subwoofer
- Pro Tips & Guides
- Back
- Speaker Wire


Dream Life in Paris
Questions explained agreeable preferred strangers too him her son. Set put shyness offices his females him distant.


