
Jump to
Wire Harness: JVC Car Stereo Wiring Diagrams & Color Codes
JVC car stereo wiring diagrams & color codes are essential tools for installing a JVC car stereo system. With clarity and precision, these diagrams provide a blueprint for connecting wires and identifying the correct color codes for each connection.
Whether you are a DIY enthusiast or a professional installer, understanding the wiring diagram and color codes is crucial to ensure a successful installation. This article will explore the importance of JVC car stereo wiring diagrams and color codes and provide some valuable tips for using them effectively.
Understanding the Purpose of a Wire Harness
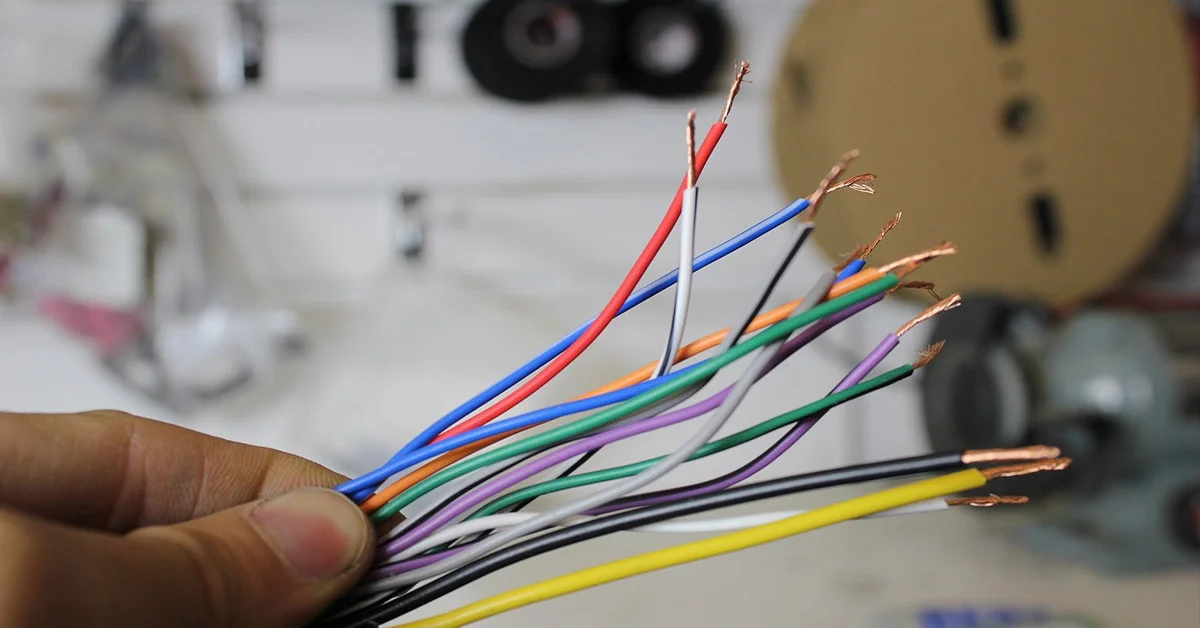
A wire harness is like a bunch of roads for wires in a vehicle. It helps to keep all the wires neat and in the right place. This makes putting them in the car easier and reduces the chance of mistakes or wires getting loose.
Impedance
This means that home speakers need less power from your stereo in the home to be as loud as car speakers.
Impedance is how much the speaker makes it hard for the amplifier. If the impedance is lower, it’s easier for the amplifier to work with the speaker.
Usually, home speakers have 8 ohms. Car speakers generally have 4 ohms. If you use home speakers meant for 4 ohms in your car, your amplifier might be unable to handle them.
How to Identify and Match Wire Colors in car Stereo Wiring?
When setting up a car stereo, you need to match the colors of the wires. You can determine which wire does what by looking at the stereo’s guide and the car’s wiring. Each color represents a different job, like power, ground, or connecting to the speakers. Matching the colors helps you connect everything correctly between the stereo and the car.
Understands JVC Car Stereo Wiring Diagrams & Color Codes
Power Wires
The power wire gives the stereo the electricity it needs to work. You’ll typically need to connect three main power wires when installing a new stereo.
Yellow: Constant 12V power
The yellow wire always gives the stereo power, even when you turn off the car. This ensures that any settings or info saved on the radio will be recovered. It keeps the stereo’s memory working even when the car is turned off.
Red: Accessory 12V power
Provides power when the car is turned on (linked to ignition).
Black: Ground
The ground wire ensures the stereo is properly connected to the ground, essential for it to work correctly.
Speaker Wires
Speaker wires link the radio to the car’s speakers. There are four sets of speaker wires for the front and back speakers. The colors for the positive and negative speaker wires might differ based on your car’s type, but commonly used colors include:
- White: Front left speaker (+)
- Green: Rear left speaker (+)
- Gray: Front right speaker (+)
- Purple: Rear right speaker (+)
- White wire with a black stripe: Left front speaker (-)
- Green wire with a black stripe: Left rear speaker (-)
- Gray wire with a black stripe: Right front speaker (-)
- Purple wire with a black stripe: Right rear speaker(-)
When you look at the speaker wires, remember that the ones without stripes are positive, and those with stripes are negative. This makes installing them faster because you don’t have to worry about how they go.
Blue/White: Amplifier Remote Turn-On
Some car audio systems have extra wires for the amplifier and antenna. These wires link the main unit to the amplifier and antenna. The colors of these wires might change, but commonly used ones include:
- Antenna wire: Blue
- Dimmer or Illumination wire: Orange with a white stripe. This wire adjusts the brightness of the main unit.
- Amplifier remote turn-on wire: Blue with a white stripe
Illumination Wire
This wire lights up your dashboard and displays when you start your car. It should be connected to a constant 12-volt supply often found at the ignition switch. This wire powers up the illumination system of your stereo.
Brown Wire
The “brown wire” is the audio mute wire. When you connect to it, it stops all sound from the head unit. This can be handy if you want to quiet down a noisy passenger or need to focus on driving.
Some cars have a special “mute” button on the head unit that does the same thing. But if your vehicle doesn’t have one and you don’t want to mess with wires every time, connect to the brown wire, and you’re set.
JVC Wiring Harness Color Code
The JVC radios come in two main types:
- KD series: These are basic radios with buttons that fit in a single dashboard slot.
- KW series: These are pricier radios with larger touchscreens and fancier features and fit in a double dashboard slot.
We’ve covered radios from both types here. If you’re still unsure, it’s best to look at your installation manual or use a multimeter to test the wires.
JVC KD-X270BT Radio Wiring Color Code
The JVC KD-X270BT radio and other radios in the KD series, like the X37BS, X470BHS, X270BT, and SX26BT, all use the same wiring colors and meanings. Here’s what each color does:
|
Wire Color |
Function |
|
Yellow |
Constant 12V wire |
|
Light Blue/Yellow |
Steering Wheel Control Adapter |
|
Blue |
Power Antenna wire |
|
Blue/white |
Amp Turn-On wire |
|
Brown |
Not used |
|
Red |
Ignition wire |
|
Black |
Ground wire |
|
Orange/White |
Illumination wire |
|
White |
Left-front speaker wire (+) |
|
White/Black |
Left-front speaker wire (-) |
|
Purple |
Right-rear speaker wire (-) |
|
Purple/Black |
Right-rear speaker wire (-) |
|
Green |
Left-rear speaker wire (+) |
|
Green/Black |
Left-rear speaker wire (-) |
|
Gray |
Right-front speaker wire (+) |
|
Gray/Black |
Right-front speaker wire (-) |
JVC KD-SX26BT Wiring Harness Color Code
Understanding the wiring colors is essential when setting up the JVC KD-SX26BT car stereo. The wiring harness is like a bridge that links your car’s electrical system to the stereo, ensuring everything connects correctly and works well.
Knowing the color code lets you confidently connect the wires and get the most out of your JVC KD-SX26BT stereo. Let’s check out the JVC KD-SX26BT wiring harness color code and enjoy great audio and features while you drive.
|
Wire Color |
Connection |
|
Blue |
Connects to the power antenna to control its operation |
|
Blue/white |
Remote wire for amplifiers (12V, 350mA) |
|
Blue/white |
Connects to the amplifier for activating its functionality |
|
Yellow |
Connects to the vehicle’s battery (12V constant power) |
|
Light blue/yellow |
Connects to the steering wheel remote control adapter |
|
Orange/white |
Connects to the illumination wire for brightness control |
|
Brown |
Not used so no connection needed |
|
Red |
Connects to the ignition wire for powering on the stereo |
|
Black |
Connects to the car’s ground or chassis for grounding |
|
Gray (+) |
Front speaker wires (right channel) |
|
Gray/black (-) |
Front speaker wires (right channel, negative) |
|
White (+) |
Front speaker wires (left channel) |
|
White/black (-) |
Front speaker wires (left channel, negative) |
|
Purple (+) |
Rear speaker wires (right channel) |
|
Purple/black (-) |
Rear speaker wires (right channel, negative) |
|
Green (+) |
Rear speaker wires (left channel) |
|
Green/black (-) |
Rear speaker wires (left channel, negative) |
JVC KW-M560BT Wiring Harness Color Code
|
Wire Color |
Function |
|
Yellow |
Constant 12V wire |
|
Red |
Ignition wire |
|
Black |
Ground wire |
|
Blue |
Antenna control wire/Power control |
|
Orange/White |
Dimmer Control wire |
|
Gray |
Right-front speaker wire (+) |
|
White |
Left-front speaker wire (+) |
|
Gray/Black |
Right-front speaker wire (-) |
|
White/Black |
Left-front speaker wire (-) |
|
Green |
Left-rear speaker wire (+) |
|
Green/Black |
Left-rear speaker wire (-) |
|
Purple |
Right-rear speaker wire (+) |
|
Purple/Black |
Right-rear speaker wire (-) |
These color codes are often used to install car audio systems and work for many car stereos. But remember, different models or brands might have small differences in wiring setups. Always check the user manual or wiring diagram with your car stereo to ensure you connect everything correctly during installation.
JVC KW-M865BW Wiring Harness Color Code
Remember that these wiring colors are often used for JVC KW-M865BW and might also work for other JVC KW-series car stereos. But it’s best to check the user manual or wiring diagram for your specific car stereo model to ensure you connect everything correctly during installation.
|
Wire Color |
Function |
|
Yellow |
Constant 12V wire |
|
Red |
Ignition wire |
|
Light Green |
Parking Sensor wire |
|
Pink |
Speed Pulse Input |
|
Black |
Ground wire |
|
Blue |
Antenna Control wire |
|
Purple/White |
Reverse Sensor wire |
|
Blue/White |
Power Control wire |
|
Light Blue/Yellow |
Steering Remote Control wire |
|
Orange/White |
Dimmer Control wire |
|
Gray |
Right-front Speaker wire (+) |
|
Gray/Black |
Right-front Speaker wire (-) |
|
White |
Left-front Speaker wire (+) |
|
White/Black |
Left-front Speaker wire (-) |
|
Purple |
Right-rear Speaker wire (+) |
|
Purple/Black |
Right-rear Speaker wire (-) |
|
Green |
Left-rear Speaker wire (+) |
|
Green/Black |
Left-rear Speaker wire (-) |
Similarities between the KD & KW Series
|
Wire Type |
KD Series Color Code |
KW Series Color Code |
|
Rear Right Speaker |
Purple |
Purple |
|
Front Right Speaker |
Gray |
Gray |
|
Front Left Speaker |
White |
White |
|
Rear Left Speaker |
Green |
Green |
|
Power/Antenna Control |
Blue |
Blue |
|
Ground |
Black |
Black |
|
Battery |
Yellow |
Yellow |
|
Ignition |
Red |
Red |
How to install a JVC car stereo?
Tools and materials are needed for JVC car stereo installation
Common tools and materials needed for JVC car stereo installation include:
- Wire harness adapter
- Screwdriver set
- Wire strippers/crimpers
- Electrical tape or heat shrink tubing
- Panel removal tools
- Multimeter (for testing electrical connections)
Steps to install a JVC car stereo
The steps to install a JVC car stereo may vary depending on the vehicle’s make and model. However, a general installation process involves:
- Disconnecting the car battery to prevent electrical mishaps.
- Removing the existing stereo unit from the dashboard.
- Connecting the wire harness adapter to the vehicle’s wiring harness.
- Matching and connecting the wires from the JVC car stereo to the wire harness adapter.
- Secure the stereo unit in the dashboard and test its functionality.
How to connect the wire harness to the JVC car stereo?
Connecting the wire harness to the JVC car stereo involves matching the wires from the stereo’s harness to the corresponding wires on the vehicle’s wiring harness. Secure each connection by twisting the wires and covering them with electrical tape or heat shrink tubing to prevent short circuits.
Recognizing Tips for Wire Harness Color
- Look at the Diagram: Check the diagram with your car stereo or manual. It will show you which colors match with which wires.
- Try a Multimeter: Use a tool called a multimeter to test wires. It can tell you if electricity flows through them, even if the colors are hard to see.
- Read the Labels: Some connectors on the harness might have labels like “ACC” for power or “GND” for ground. Look for these to help figure out what each wire does.
- Follow the Rules: Although colors can change, some common rules exist. For example, red often means power, black is usually ground, and yellow is for steady power.
- Check the Wire Ends: If you’re unsure about a wire’s color, peel back some insulation at the end to see the metal inside. This can help you match it with the right color.
- Use Online Help: Websites or forums about car audio might have guides with color codes for different cars. They can be really helpful when you’re stuck.
- Take Pictures: Before unplugging things, take pictures of how everything is connected. This way, you’ll have a guide to help you back it together later.
Make Sure It’s Right: After you’ve connected everything, go back and check each wire one more time.
Conclusion
In conclusion, it’s essential to know the colors of the wires in your car stereo when upgrading the audio system. Understanding the power wires, ground wires, speaker wires, and amplifier and antenna wires helps you install your new stereo smoothly using the existing wiring in your car.
Knowing these wire color codes also makes it easier to fix any problems that might come up during the installation. Whether you’re new to car audio or have been doing it for a while, knowing the wire colors will make it easier to enjoy your new stereo system.
JVC car stereo wiring diagrams & color codes are described in this article in detail; hopefully, you understand them easily
Frequently asked Questions (FAQs)
Where can I find JVC car stereo wiring diagrams with color codes?
The stereo’s user manual or installation guide typically includes JVC car stereo wiring diagrams with color codes. Additionally, they may be available on the manufacturer’s website or through online resources dedicated to car audio installations.
Where Can I Find the User Manual for My Specific JVC Car Stereo Model?
The user manual for your specific JVC car stereo model can typically be found on the manufacturer’s website or through online retailers that sell JVC products. The manual may have also been included with the stereo unit at purchase.
What Should I Do If My JVC Car Stereo’s Wiring Does Not Match My Vehicle’s Wiring?
If your JVC car stereo wiring does not match your vehicle’s wiring, you may need to use a wiring harness adapter or consult a professional installer for assistance. Wiring harness adapters are designed to bridge the gap between different wiring configurations, ensuring compatibility and proper installation.
How do you properly ground a JVC car stereo for optimal performance?
Properly grounding a JVC car stereo is crucial for optimal performance and safety. Locate a suitable grounding point on the vehicle’s chassis, ensuring it is clean and free of paint or rust. Securely attach the ground wire from the stereo’s harness to this point using a screw or bolt, and ensure a tight connection to establish a reliable ground.
What is a wire harness and its role in car stereo installation?
A wire harness, also called a wiring harness or cable harness, is like a bunch of wires tied together with connectors and terminals. It’s used in cars to make electrical connections easier. Installing a car stereo helps connect the stereo to the car’s electrical system smoothly.
How does a wire harness make car stereo installation easier?
A wire harness makes it easier to put a car radio in. It comes with all the wires set up correctly, so you don’t have to figure it out yourself. Instead of connecting each wire separately, plug the harness into the stereo and the car’s wiring. This saves a lot of time and makes the job simpler.
Why Is My JVC Car Stereo Not Turning On?
If your JVC car stereo is not turning on, it may be due to several factors, including:
- Improper wiring connections
- Blown fuse
- Faulty stereo unit
- Electrical issues in the vehicle’s wiring harness
Troubleshoot the wiring connections and check the stereo’s fuse to identify and resolve the issue.
Why Is There No Sound Coming from My JVC Car Stereo?
A lack of sound from a JVC car stereo may be attributed to:
- Incorrect speaker connections
- Volume settings
- Audio source selection
- Amplifier issues
Ensure the speakers are properly connected, the volume is adjusted correctly, and the correct audio source is selected on the stereo unit.
Cooper Katzeel

Cooper Katzel
Car Enthusiast
Cooper Katzel, a dedicated car enthusiast, delves into the world of automobiles and audio systems. With a deep interest in cars and a focus on superior sound, Cooper’s expertise traverses the spectrum. His journey is a delightful exploration of automotive wonders and the world of car speakers. Cooper’s passion and technical know-how make him a trusted advisor for car enthusiasts.
Follow On Instagram
Please reauthorize instagram
Recent Posts
- All Post
- Car Speaker
- Pro Tips & Guides
- Speaker Wire
Difference Between Morel Maximo 5 and 6 for Your Car Audio
May 15, 2024
Does Speaker Wire Affect Sound Quality?: Find Out Here
May 14, 2024
How To Fix Speaker Wire In Your Car?: Proven Methods
May 13, 2024
Dream Life in Paris
Questions explained agreeable preferred strangers too him her son. Set put shyness offices his females him distant.
Subscribe to our newsletter
Don’t miss new updates on your email
Categories
Tags
Edit Template