Jump to
Elevate Your Drive: How to Make Car Audio Distribution Panel

How to Make Car Audio Distribution Panel? Do you want to upgrade the audio distribution system in your car? If you want to improve your car’s sound system, think about getting a car audio distribution panel.
This tool is perfect for people who love great sound quality in their cars. It lets you connect different sound parts, like amplifiers, equalizers, and crossovers, all in one spot. A distribution panel ensures power and sound signals are shared well, which helps stop noise and interference.
This means you’ll get a clearer and more enjoyable sound when driving. In this article, we’ll explain how a car audio distribution panel can improve your car’s sound system.
Understanding Car Audio Distribution Panels
Car audio distribution panels are like the main power station for your car’s sound system. They make sure that all the extra parts, like amplifiers and voltage converters, get the power they need safely and without waste. Everything connected to one central point keeps it neat, makes your system’s power more stable, and improves the sound you hear.
You can find these panels in many different shapes and sizes; sometimes, they can cost quite a bit. Many people choose to have their panels custom-made to fit perfectly with their car’s specific design and needs.
Purpose of a distribution panel in a car audio
A distribution panel is essential for improving your car’s sound system. It’s like a control center that sends power and sound to your speakers, amps, and subwoofers. This panel helps keep all the cables neat and in order, ensuring your system works as well as it can and reduces unwanted noise.
Having everything connected through one central point makes your car’s audio system work smoothly and sound great.
Key components in a car audio distribution panel
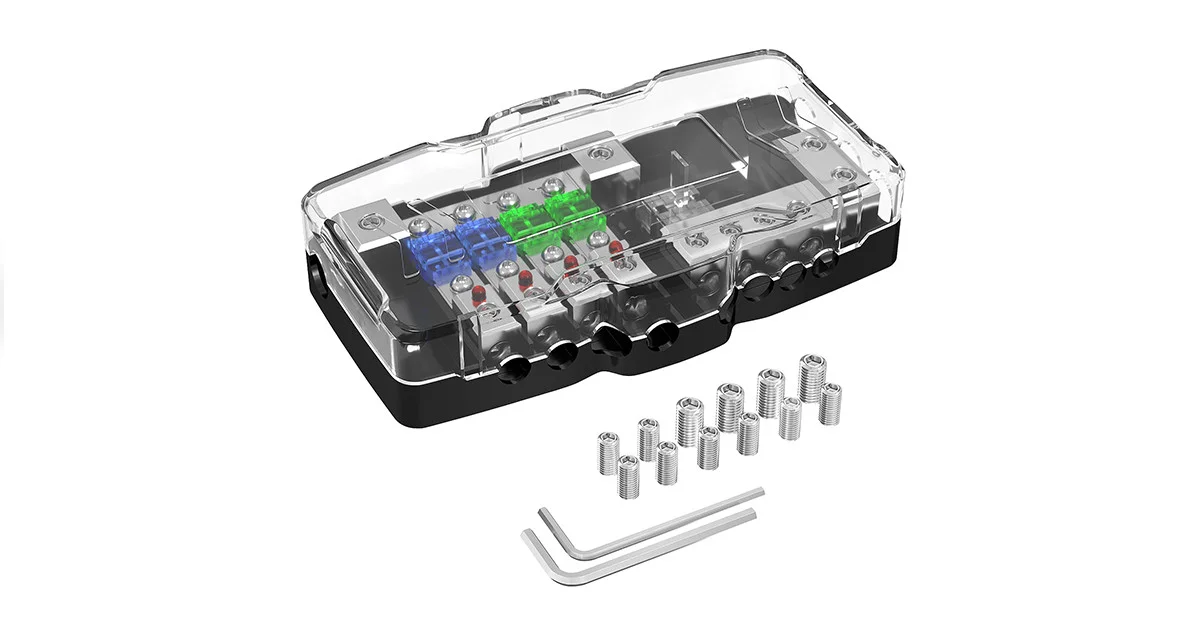
You’ll find a few main parts in a car audio distribution panel. These include distributions block, wires, power blocks, and terminals. The car audio distributions block is key because it connects all the power and ground wires, ensuring each part of your audio system gets the right amount of power.
It’s also important to use high-quality cables and terminals. This helps keep the sound clear by ensuring the electricity flows well and reducing any sound quality loss.
Understanding the Components
Before thinking about installation, you must be familiar with the components.
Audio Distribution Block
This unit is central to the panel, ensuring all connected audio elements receive the necessary power without overloading the system.
Wiring and Cables
The wiring and cables transmit the audio signal and electricity. High-quality ones are essential for maintaining signal integrity.
Connectors and Terminals
These are the spots where everything in your sound system connects. Choosing and fitting them correctly ensures your system works well and safely.
Planning and Design
A well-thought-out design is the backbone of an effective distribution panel.
Assessing the Car Audio System
First, look at what your system has right now. Think about how many amplifiers you have and how your speakers are set up.
Sketching the Distribution Panel Layout
Make a drawing that shows where each part goes and how they connect. This plan will guide you when you’re putting your distribution panel together.
Materials and Tools Needed
Before you put your hands on any metal, you need to gather all the required parts and tools.
Materials
Here’s a list of the materials you’ll need for a standard distribution panel:
- Power distribution block(s)
- Inline fuse holders and fuses
- Large gauge power cable
- Insulated wire terminals (ring terminals, fork terminals, etc.)
- Insulated spade connectors
- Shrink tubing
- Distribution block covers
Tools
You’ll need some tools to bring your project to life:
- Soldering iron and solder
- Wire stripper
- Crimping tool
- Multimeter
- Heat gun or lighter
- Drill with assorted bits
- Screwdriver set
- Wrench set
- Socket set
Step by Step Guide to Make Car Audio Distribution Panel
Here is a detailed step-by-step guide to constructing a distribution panel from scratch.
Step 1: Planning the Layout
This phase is all about the blueprint.
Know Your Needs
Understand the requirements of your audio system. How many things need to be connected? What kinds of connections do your devices use?
Choose the Right Panel Size
Choose a panel size that fits all your parts and fits well in your car.
Sketch Your Design
Suppose you can draw a plan on paper or with a computer program. Draw where to install the distributions blocks and fuses and where to write labels. This helps ensure you get the right size panel and enough distributions block for your needs.
Wiring the Components
This part requires precision and patience.
Measure Twice, Cut Once
Cut the power cable and distribution wires to the right length based on your measurements from the planning stage.
Crimping and Soldering
Attach the correct terminals to the cables using crimping or soldering. Remember, your audio system might only work well if you do it right.
Proper Placement of Fuses
Put in-line fuses near each component’s power source or distributions block on the positive power wire. These fuses are important to keep your parts safe.
Organize Your Wires
Put cable covers and wire wraps around your cables to keep them safe and tidy before connecting them to the distribution panel. Being organized is essential for safety.
Step 3: Mounting the Panel in the Vehicle
Now that the difficult part is finished, it’s time to ensure the installation is safe and works properly.
Choose a Secure Location
Pick a place you can easily reach in your car and where things won’t move around if there’s an accident.
Grounding
Connect all ground cables to one spot firmly attached to the car’s frame. Good grounding is just as necessary as good wiring.
Secure the Panel
Use the correct screws or bolts to attach the distribution panel firmly. Be careful not to tighten them too much or harm the car.
Step 4: Testing and Troubleshooting
You’re almost there, but the installation is not complete yet.
Testing Your System
Connect the battery and your audio parts to the distribution panel. Then, switch on the system and make sure everything works okay and there are no power problems.
Troubleshooting
If you have problems like lights flickering or things not working, use a multimeter to check how much electricity flows in different parts of your system. Look closely at the connections, fuses, and where the cables connect to the car to find any problems.
Make Adjustments
After testing and fixing problems, adjust the panel or cables if needed. This could mean tightening a connection or changing how a cable is placed.
Advantages of using a distribution panel
- It makes adding more speakers or amps easy.
- It helps stop electrical problems, keeping your system safe.
- Protects your sound system from damage by power issues, making it last longer.
Tips and Tricks for a Successful Installation
Here are some additional nuggets of wisdom that can make a significant difference in the quality and performance of your vehicle audio distribution panel.
Ensure Proper Ventilation
Make sure there’s enough space around the panel for air to flow. This helps protect things like amplifiers from getting too hot.
Use Isolation Mounts
Put components like amplifiers on rubber mounts when you can. This stops them from shaking too much and getting damaged.
Manage Your Expectations
Bad or broken parts will sound even with a great panel. Make sure everything you use is good quality and works well.
Don't Rush
Take your time, especially when setting up power. If you rush, your audio will sound better.
Document Your Build
Write down everything you do when you install your panel. This helps if you need to fix something later or want to upgrade.
Conclusion
Using this guide, you’ve made a special vehicle audio panel that fits what you need and gives you great sound in your car. With careful planning, building, and testing, your panel will be the base for a powerful, clear, dependable audio system.
Remember, paying attention to the small things is important, so take your time and have fun making something right for your car. Hopefully, now you can make car audio distribution panel.
Frequently asked Questions (FAQs)
A vehicle audio distribution panel spreads sound to different speakers in a car so that the sound is even everywhere.
To connect several car amps, you’ll use a distribution’s block to hook them up to one power source. Each amp also needs its cable to turn it on, a cable to ground it, and a set of RCA cables.
Disconnect the car battery’s negative terminal to put in a vehicle audio distributions block. Then, attach the power cable to the block’s input and connect the output cables to the amplifiers and other sound parts.
Putting special speakers in a car gives you better sound quality and makes listening to music more enjoyable, just like you like it.
To make a special box for your car’s subwoofer, choose the right materials, follow a step-by-step guide, cut carefully with a router, and make sure it fits snugly for the best sound.
A brace helps support and steady special speaker boxes in a car, stopping shaking and making the sound better.
To improve your car’s sound system, consider adding a capacitor to keep the power steady, upgrading to good speakers, using a sound adjuster to tweak settings, and ensuring everything’s installed right for the best sound.
When choosing parts for a special car sound system, think about how much power they can handle, if they match the other parts, if they fit the car, if they’re well made, and if they all work well together for good sound.
Cooper Katzeel
Car Enthusiast
Cooper Katzel, a dedicated car enthusiast, delves into the world of automobiles and audio systems. With a deep interest in cars and a focus on superior sound, Cooper’s expertise traverses the spectrum. His journey is a delightful exploration of automotive wonders and the world of car speakers. Cooper’s passion and technical know-how make him a trusted advisor for car enthusiasts.
Follow On Instagram
Recent Posts
- All Post
- Blog
- Car Speaker
- Car Subwoofer
- Pro Tips & Guides
- Back
- Speaker Wire


Dream Life in Paris
Questions explained agreeable preferred strangers too him her son. Set put shyness offices his females him distant.


