Jump to
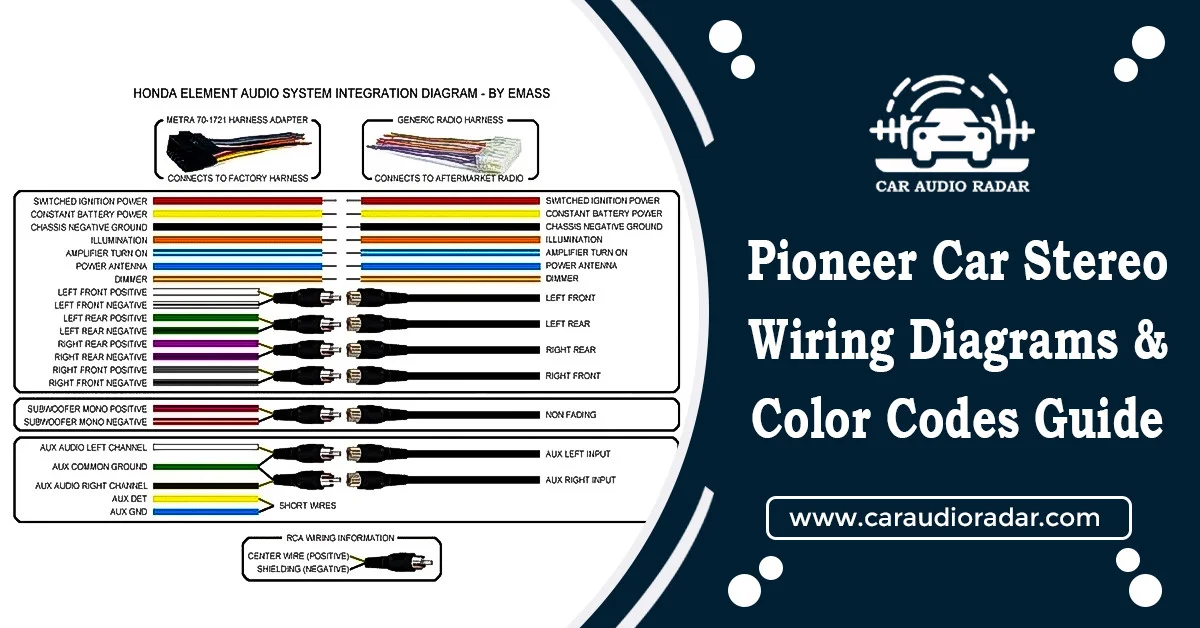
Pioneer Car Stereo Wiring Diagrams & Color Codes Guide

Setting up a car stereo can be tricky, especially if you need to familiarize yourself with a car’s electrical system. A major challenge is figuring out and connecting the wires in the wiring harness.
Luckily, most car stereo wiring harnesses use color coding to make things easier. Each wire comes with a specific color indicating its function.
This article will focus on the Pioneer car stereo wiring diagrams and color codes. Understanding this code makes it easy to identify and connect wires confidently during your car stereo installation, boosting your confidence in installing the stereo.
Understanding Pioneer Car Stereo Wiring Color Codes
It is essential to understand the color code of the wiring diagram for installing a Pioneer car stereo. Let’s explore the meaning behind each wire color:
Red Wire
Most head units have a red wire used as the “ignition” or a “power” wire. When the ignition is turned on, this wire produces 12 volts of DC power to your car stereo. The red wire must be connected to a switched power source, like the fuse box fuse.
If there is no fuse, the red wire will continuously provide power to the stereo, even when the ignition is turned off, which will drain your battery. Therefore, ensure that the red wire is permanently fused correctly.
Brown Wire
The brown wire is commonly used for audio mute in a car audio system. When the audio mute wire is connected to the head unit, it effectively mutes all sound from the head unit. This can be useful when you want to temporarily turn off the audio, such as when you receive a call or travel through a toll booth.
Yellow Wire
The yellow wire is commonly known as the “memory” in a car stereo. It is often used for 12V memory or “clock” signals. This wire provides power to the car stereo even when the ignition is switched off, allowing it to maintain its settings and any stored media.
The yellow wire must be permanently connected to the battery or another reliable power source. Sometimes, it can also be utilized for tuner functions.
Black Wire
The black wire functions as the ground wire, providing a pathway for electricity to flow to the car stereo. Connect it to a metal ground point on the chassis, ensuring proper attachment near the battery to prevent issues like static or speaker damage. Seek assistance from a mechanic or audio specialist if you need more clarification.
Black Wire with White Stripe
The black wire with a white stripe in a car stereo harness is often used as a ground wire for the factory amplifier. The factory amplifier, installed in the vehicle during manufacturing, is responsible for powering the car’s speakers.
This wire is connected to the factory amplifier’s ground terminal, ensuring the electrical circuit’s completion and enabling the amplifier to function correctly.
Orange Wire
The orange wire in your car stereo lights up the dashboard when the car is on. This wire connects the head unit to the vehicle’s dash light dimmer switch, allowing for adjusting the brightness of the dashboard lights.
It should be connected to a constant 12-volt source, usually found at the ignition switch, to ensure proper functionality. It’s often a red wire with a white stripe in the head unit to the amplifier harness.
Blue Wire
The blue wire on an aftermarket car stereo is called the antenna power wire. Its role is to supply power to the antenna, ensuring its proper functionality. Typically, the blue wire is connected to a 12-volt power source.
When installing a new aftermarket car stereo, it is essential to connect it to the same power source as the other stereo wires to prevent any potential damage or performance issues with your antenna.
Blue Wire with White Stripe
The Blue Wire with a White Stripe can be the amplifier turn-on wire.
Gray Wire
The gray wire functions as the positive wire for the right front speaker.
Gray Wire with Black Stripe
The Gray Wire with Black Stripe functions as the negative wire for the right front speaker.
Green Wire
The green wire functions as the positive wire for the Left Rear speaker.
Green Wire With Black Stripe
The Green Wire with a Black Stripe is the negative wire for the Left Rear speaker.
Purple Wire
The Purple Wire serves as the positive wire for the Right Rear speaker.
Purple Wire with Black Stripe
The Purple Wire with Black Stripe functions as the negative wire for the Right Rear speaker.
Tips for Recognizing Wiring Harness Color Codes
Refer to the Manual
First, check the vehicle stereo instructions. Many Pioneer car stereo manuals have a wiring diagram and a list of wire colors and functions, making it the best source for identifying the wiring harness color codes.
Use a Wiring Harness Adapter
If your car stereo doesn’t come with a wiring harness, you might require a wiring harness adapter to link the stereo to the vehicle’s wiring. These adapters are designed to align with specific makes and models’ wiring harness color codes.
Using them makes installation easier, saving you time and effort that would be spent figuring out color codes on your own.
Use a Multimeter
A multimeter is a tool that helps measure resistance, voltage, and current in electrical circuits.
To identify wiring harness color codes using a multimeter, turn on the ignition and set the multimeter to measure voltage.
Then, touch the probes of the multimeter to each wire in the harness one at a time and observe the readings. The one with a higher voltage is the power source.
Seek Professional Advice
If you’re unsure about identifying wiring harness color codes or feel uneasy working with electrical components, it’s best to ask for help from a professional. A car audio specialist or mechanic can help you identify color codes and installers.
Pioneer Wiring Harness Installation Guide
Here are some simple steps to follow:
Locate The Wiring Harness
The wiring harness is often found behind the stereo unit. It consists of a bundle of wires connected to the back of the stereo and running to different electrical components in the car.
Identify The Wires
Each wire in the wiring harness typically comes with a specific color code. It is essential to accurately identify these wires before connecting them to ensure the proper functioning of the stereo.
Connect The Wiring Harness
After identifying the wires, connect the wiring harness to the back of the stereo unit. Ensure that you match the cables with the correct connections on the stereo.
Connect The Ground Wire
The ground wire is usually a black wire that connects to a metal ground point in the car. This connection ensures the stereo is appropriately grounded for proper functionality.
Test the Car Stereo
After connecting the wiring harness, test the stereo to ensure proper functionality. Switch on the stereo and adjust the volume to ensure the speakers work correctly.
Secure The Wiring Harness
You can secure the wiring harness after testing the stereo and confirming its proper functioning. This might include tucking the wires behind the dashboard or connecting them with cable ties.
Reconnect The Battery Cable
Once the installation is complete, you can reconnect the negative battery cable to finish the process.
Conclusion
The Pioneer car stereo wiring diagrams and color codes use specific colors to indicate the function of each wire. For instance, red is for accessory power, black is for ground, and blue is for power antenna. Colors like orange, brown, and gray identify positive and negative wires for the vehicle’s speakers.
Identifying and connecting these wires in the wiring harness is essential for correctly operating the car stereo and other electrical components.
If you’re comfortable working on your car, you can easily handle the replacement with some effort. If not, consider a professional car workshop. The whole process should take over a couple of hours.
Frequently asked Questions (FAQs)
What are the most common causes of wiring harness issues?
Wiring harnesses can arise due to physical damage, corrosion, and natural wear and tear over time. Problems may also occur due to moisture and exposure to extreme temperatures.
How can I prevent wiring harness issues?
Keep the wires and connectors clean and dry to prevent wiring harness issues and protect them from damage. Regular maintenance and inspections can help identify potential issues before they become more significant problems.
Is it recommended to splice it into the existing wiring harness in my car?
Splicing into an existing wiring harness is generally not advised, as it can lead to problems with the car’s electrical system and potentially damage other components. When adding a new element to your car’s electrical system, using a wiring harness specifically designed for that component is typically better.
Can a wiring harness be upgraded or modified?
Professionals can upgrade or modify a wiring harness for better performance or added features if needed. However, ensuring such changes are done safely without compromising the car’s electrical system is crucial.
Is a wiring harness necessary?
Using a wiring harness is necessary when installing an aftermarket unit to replace your factory radio. It lets you connect the new head unit to your car’s electrical system without cutting any existing wires, making the installation easier and ensuring a problem-free stereo setup.
Cooper Katzeel

Cooper Katzel
Car Enthusiast
Cooper Katzel, a dedicated car enthusiast, delves into the world of automobiles and audio systems. With a deep interest in cars and a focus on superior sound, Cooper’s expertise traverses the spectrum. His journey is a delightful exploration of automotive wonders and the world of car speakers. Cooper’s passion and technical know-how make him a trusted advisor for car enthusiasts.
Follow On Instagram
Please reauthorize instagram
Recent Posts
- All Post
- Car Speaker
- Pro Tips & Guides
- Speaker Wire

Difference Between Morel Maximo 5 and 6 for Your Car Audio
May 15, 2024
Does Speaker Wire Affect Sound Quality?: Find Out Here
May 14, 2024
How To Fix Speaker Wire In Your Car?: Proven Methods
May 13, 2024
Dream Life in Paris
Questions explained agreeable preferred strangers too him her son. Set put shyness offices his females him distant.
Subscribe to our newsletter
Don’t miss new updates on your email
Categories
Tags
Edit Template