Jump to
How To Extend Speaker Wire?: Quick Solutions
Whether you’re setting up speakers in a big room or just want a neater space, integrating extended wires in installations might be something you need to do. With the right tools and methods, you can make your speaker cable longer to reach wherever you want.
In this article, we’ll talk about different ways to extend your speaker wire, like splicing, using banana plugs, and going wireless. Keep reading to learn how to extend your speaker wire with ease.
Quick Solutions for Extend Speaker Wire
Method 1: Using Wire Connectors
Materials and Tools
- Speaker wire
- Wire connectors (e.g., butt connectors, twist-on wire connectors)
- Wire cutter/stripper
- Crimping tool (if using crimp connectors)
Steps
- Cut the existing speaker wire where you want to extend it.
- Strip about 1/2 inch of insulation from the ends of the existing and new wires.
- Twist the exposed wires together, ensuring a secure connection.
- If using butt connectors, insert one wire into each end of the connector and crimp them securely using a crimping tool.
- If using twist-on wire connectors, twist the connector clockwise onto the twisted wires until it’s snug and secure.
- Repeat the process for the other end of the wire if necessary.
- Test the connection to ensure proper audio transmission.
Method 2: Using Crimp Connectors
Materials and Tools
- Speaker wire
- Crimp connectors
- Wire cutter/stripper
- Crimping tool
Steps
- Cut the existing speaker wire and the new wire to the desired lengths.
- Strip about 1/2 inch of insulation from the ends of both wires.
- Insert one wire into each end of the crimp connector.
- Use a crimping tool to crimp the connector securely onto the wires.
- Repeat the process for the other end of the wire if needed.
- Test the connection to ensure proper audio transmission.
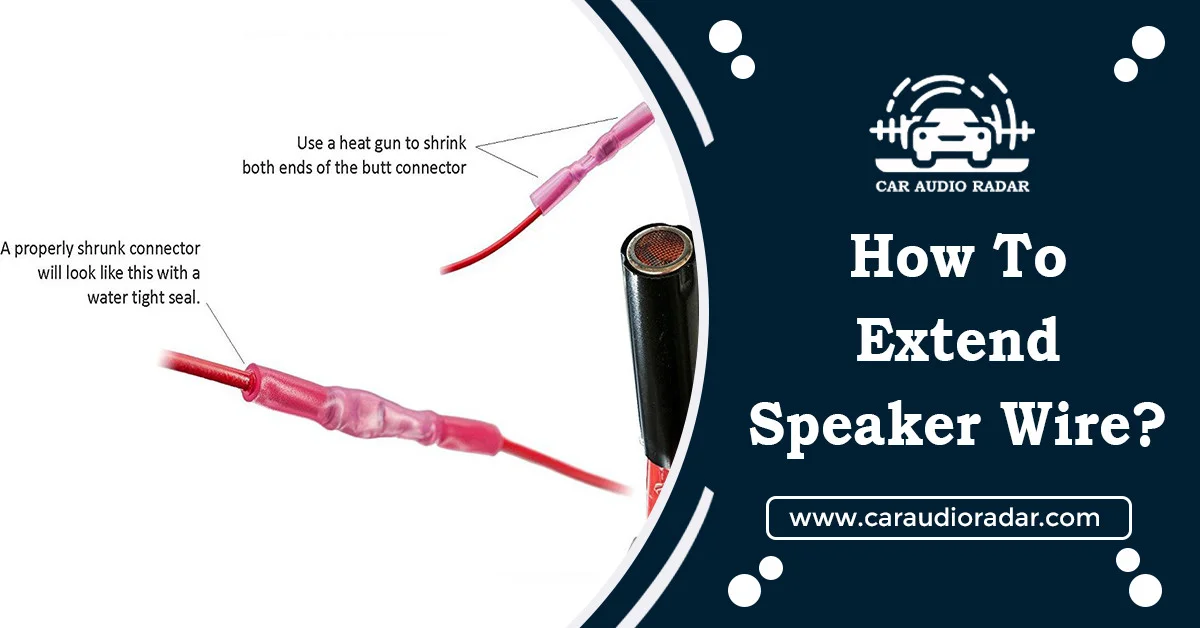
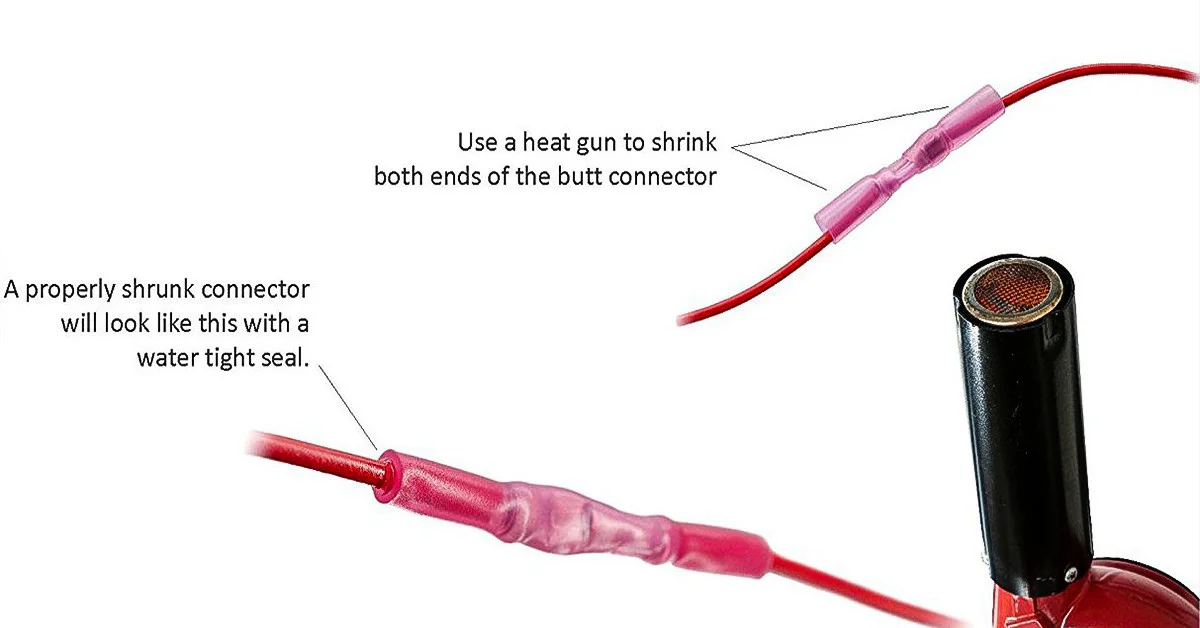
Method 3: Using Soldering
Materials and Tools
- Speaker wire
- Solder
- Soldering iron
- Heat shrink tubing
- Wire cutter/stripper
Steps
- Cut the existing wire and the new wire to the desired lengths.
- Strip about 1/2 inch of insulation from the ends of both wires.
- Twist the exposed wires together.
- Heat the soldering iron.
- Apply solder to the twisted wires, ensuring a secure connection.
- Slide heat shrink tubing over the soldered connection and heat it with a heat gun to shrink and seal the tubing.
- Repeat the process for the other end of the wire if necessary.
- Test the connection to ensure proper audio transmission.
Method 4: Using Extension Cables
Materials and Tools
- Speaker wire extension cable
- Wire cutter/stripper
Steps
- Determine the length of the speaker wire extension needed.
- Cut the cable extension to the desired length, if necessary.
- Connect one end of the extension cable to the existing car speaker wire.
- Connect the other end of the cable extension to the destination speaker.
- Test the connection to ensure proper audio transmission.
Method 5: Using Wireless Solutions
Materials and Tools
- Wireless speaker adapters
- Bluetooth receiver
- Power source (if required)
Steps
- Choose a wireless solution for your car’s stereo audio system, such as wireless speaker adapters or Bluetooth receivers.
- Follow the manufacturer’s instructions to set up and pair the wireless devices with your audio source and car speakers.
- Power on the wireless devices and test the audio transmission to ensure proper functionality.
- Adjust settings and positioning as needed for optimal audio quality.
Method 6: Using Punch Connectors
Materials and Tools
- Punch connectors (sized for your wire gauge)
Steps
- Use wire strippers to remove about 1/2 inch (1.25 cm) of insulation from the ends of the existing speaker and extension wires.
- Locate the lever on the punch connector and push it down to open the port.
- Insert the stripped wire into the open port until it reaches the bottom.
- Release the lever to close the port and secure the wire connection. Repeat for the other connection.
Method 7: Using Scotchlok Connectors
Materials and Tools
- Scotchlok connectors (sized for your wire gauge)
Steps
- Same as method 1 (strip 1/2 inch of insulation).
- Locate the small tab on the Scotchlok connector and push it down to open the chamber.
- Push the wires’ stripped ends into the connector’s separate chambers.
- Release the tab to close the chamber and pierce the wires for connection. Repeat for the other connection.
Method 8: Using Wire Nuts
Materials and Tools
- Wire nuts
Steps
- Use wire strippers to remove about 1/2 inch (1.25 cm) of insulation from the ends of the existing speaker and extension wires.
- Like the crimping method, it tightly twists the positive and negative wires.
- Twist the wires together and screw the appropriate-sized wire nut onto the connection until snug.
- Wrap the connection point with electrical tape to prevent shorts.
Note: Wire nuts are a common electrical connection method, but they are not ideal for car audio because vibrations can loosen the connection over time. This could lead to poor sound quality or even electrical issues.
Tips for Extending Speaker Wire
- Measure carefully: Make sure you measure the wire you need correctly so you don’t waste any and it fits well.
- Use the right tools: Having the right tools for the job makes it easier and ensures everything works well.
- Choose good materials: Use good-quality wire and connectors for better sound and a strong connection.
- Make connections secure: Twist wires tight or use connectors properly so they don’t come loose, especially in a car.
- Insulate connections: Use tape or tubing to cover connections and protect them from damage.
- Test before finishing: Check if the sound works before you finish everything to avoid problems later.
- Plan for future changes: Think about how you’ll reach the connections later if you need to fix them or change something.
Conclusion
Extending speaker wire is straightforward if you have the right tools and a clear plan. Whether you’re setting up speakers at home or in your car, there are several methods you can use to ensure your speakers are well-connected. From simple connectors to advanced wireless options, choose the method that fits your setup best.
To get the best results, always use high-quality wires and connectors, make sure your connections are tight, and test your setup to ensure everything sounds right. With these steps, you can efficiently extend speaker wire and enjoy great sound anywhere.
Frequently Asked Questions(FAQs)
Can you lengthen the speaker wire?
You can extend the speaker wire by adding more wire using different methods, such as splicing, connectors, or extension cables.
Can you join the speaker wire together?
Yes, you can join speaker wire together. You can twist the bare ends of the wires together tightly, use connectors like butt connectors or twist-on connectors, or solder them together for a secure connection.
Can I double up the speaker wire?
Yes, you can double up the speaker wire using two wires for each connection. This can sometimes improve the performance of your speakers, especially if they require more power.
Is it OK to coil excess speaker wire?
Yes, it’s OK to coil excess speaker wire, but it’s best to avoid coiling it tightly, as this can cause interference and affect sound quality. Instead, loosely coil the excess wire and keep it organized to prevent any issues.
Cooper Katzeel

Cooper Katzel
Car Enthusiast
Cooper Katzel, a dedicated car enthusiast, delves into the world of automobiles and audio systems. With a deep interest in cars and a focus on superior sound, Cooper’s expertise traverses the spectrum. His journey is a delightful exploration of automotive wonders and the world of car speakers. Cooper’s passion and technical know-how make him a trusted advisor for car enthusiasts.
Follow On Instagram
Please reauthorize instagram
Recent Posts
- All Post
- Car Speaker
- Pro Tips & Guides
- Back
- Speaker Wire

Ultimate Guide for Selecting Best 4″x10″ Car Speakers
October 1, 2024

Guide: Best Focal Car Speakers for Your Ride
September 23, 2024

Top 5 Best Speakers for Vinyl Record Players
September 23, 2024
Dream Life in Paris
Questions explained agreeable preferred strangers too him her son. Set put shyness offices his females him distant.
Subscribe to our newsletter
Don’t miss new updates on your email
Categories
Tags
Edit Template